H1
Harjutus 1 API
1. Paigalda Node.js
2. Loo töölauale kaust rest-api
3. Käivita koodiredaktor (nt VS Code, WebStorm vms) ja ava see kaust projektina
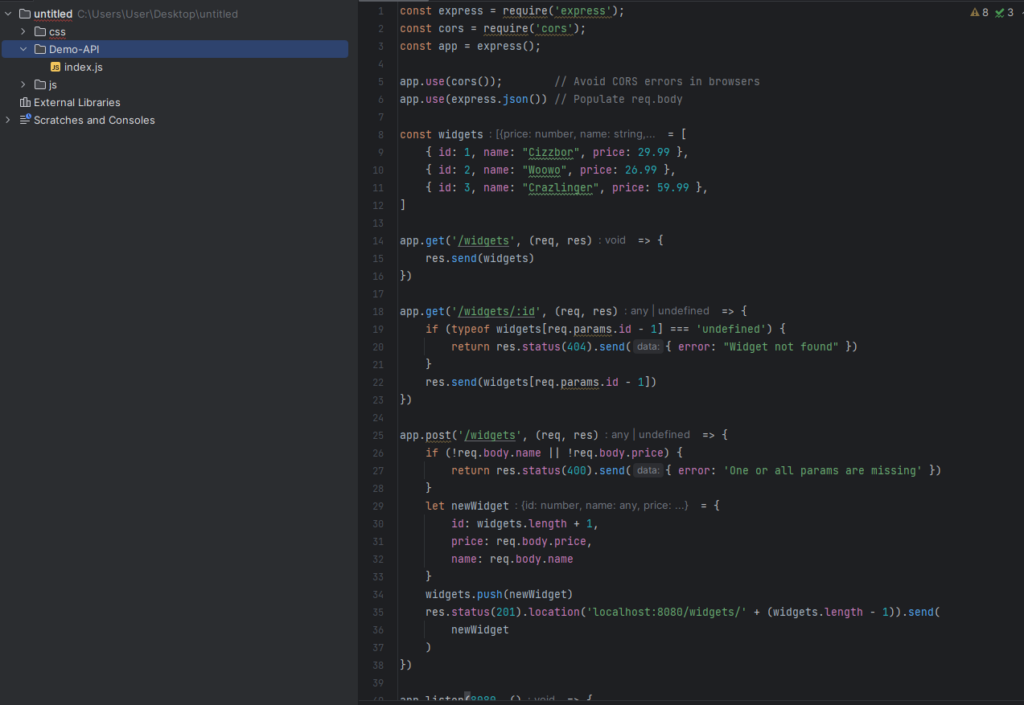
4. Loo kausta fail index.js järgneva sisuga:
const express = require('express');
const cors = require('cors');
const app = express();

app.use(cors());        // Avoid CORS errors in browsers
app.use(express.json()) // Populate req.body

const widgets = [
    { id: 1, name: "Cizzbor", price: 29.99 },
    { id: 2, name: "Woowo", price: 26.99 },
    { id: 3, name: "Crazlinger", price: 59.99 },
]

app.get('/widgets', (req, res) => {
    res.send(widgets)
})

app.get('/widgets/:id', (req, res) => {
    if (typeof widgets[req.params.id - 1] === 'undefined') {
        return res.status(404).send({ error: "Widget not found" })
    }
    res.send(widgets[req.params.id - 1])
})

app.post('/widgets', (req, res) => {
    if (!req.body.name || !req.body.price) {
        return res.status(400).send({ error: 'One or all params are missing' })
    }
    let newWidget = {
        id: widgets.length + 1,
        price: req.body.price,
        name: req.body.name
    }
    widgets.push(newWidget)
    res.status(201).location('localhost:8080/widgets/' + (widgets.length - 1)).send(
        newWidget
    )
})

app.listen(8080, () => {
    console.log(`API up at: http://localhost:8080`)
})
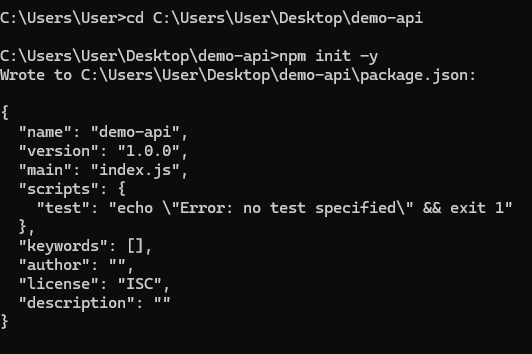
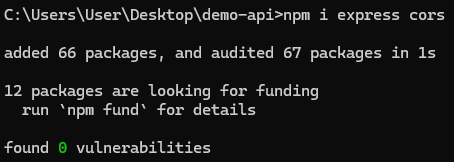
Nüüd kirjutan cmd-s järgmise:
1. npm init -y // package.json initsialiseerib node projekti
2. npm i express cors // kausta node_moodules installib express ja cors paketti
3. node . //käivitab index.js faili


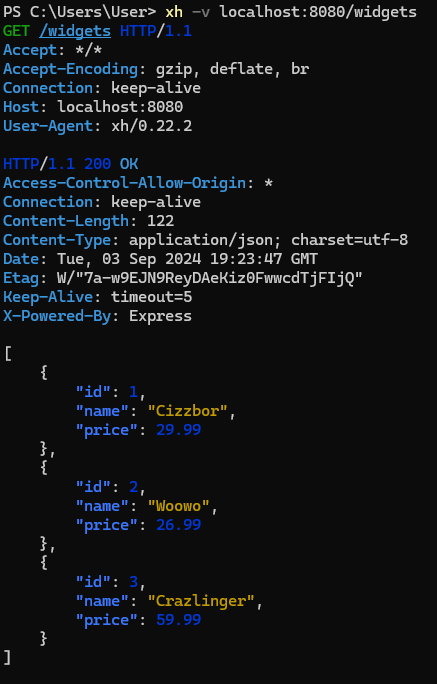
Tee PowetShell’is xh’ga GET päring vastu API-t
xh -v localhost:8080/widgets
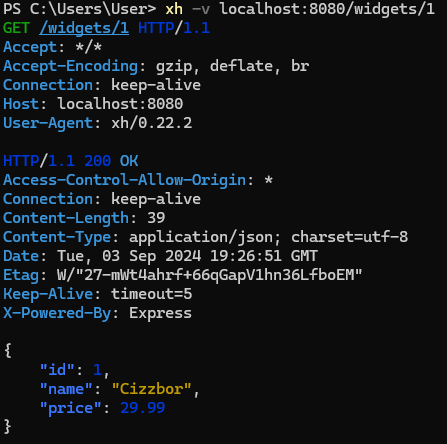
Tee PowerShelli’is xh’ga GET päring vastu API-t, mis tagastab kõik vidinad
xh -v localhost:8080/widgets/1
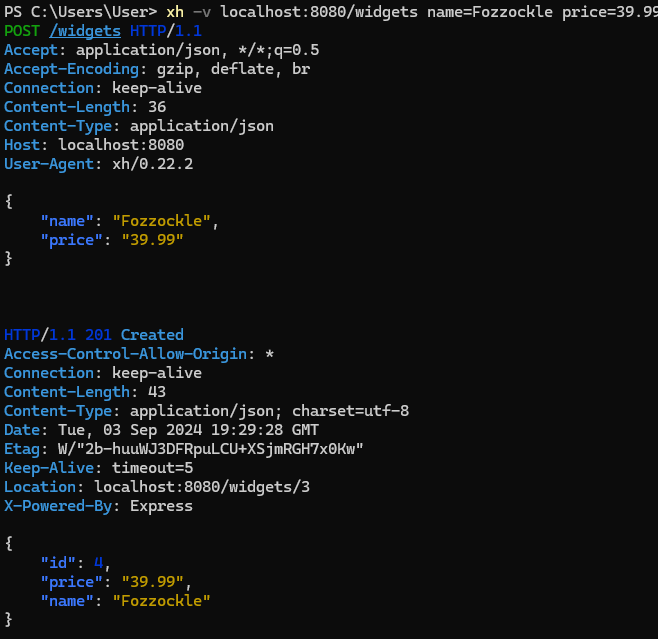
Tee PowerShelli’is xh’ga POST päring vastu API-t, mis lisab uue vidina
xh -v localhost:8080/widgets name=Fozzockle price=39.99
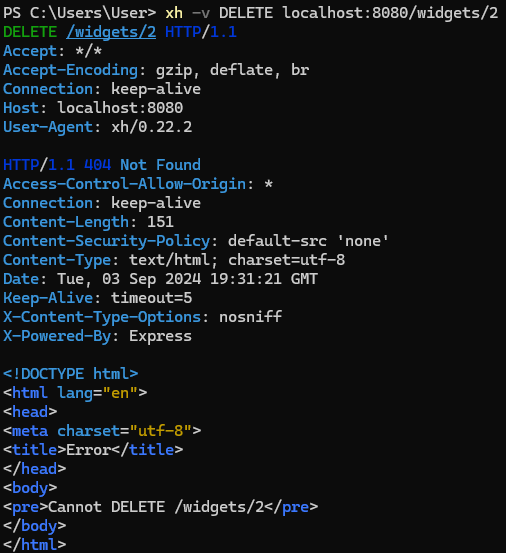
Tee PowerShelli’is xh’ga POST päring vastu API-t, mis kustutab ühe vidina
xh -v DELETE localhost:8080/widgets/2
H6 Bacon Ipsum
Bacon Ipsum on tasuta API, mis genereerib juhuslikult kalatäideteksti (kohatäiteteksti), mis põhineb lihasõnadel, nagu “peekon”, “sink” jne. Seda kasutavad veebiarendajad ja disainerid veebisaitide ja rakenduste loomisel tekstiplokkide ajutiseks täitmiseks.
- Ava veebilehitsejas Code Sandbox sait
- Vali Official Templates alt static
- Kirjuta pildil olev kood index.html faili. Alustuseks kasuta HTML trafaretti (hüüumärk ja tab klahv).
<!DOCTYPE html>
<html lang="en">
  <head>
    <meta charset="UTF-8" />
    <meta name="viewport" content="width=device-width, initial-scale=1.0" />
    <meta http-equiv="X-UA-Compatible" content="IE=edge" />
    <title>Styled Template</title>
    <style>
      body {
        font-family: Arial, sans-serif;
        background-color: #f4f4f4;
        color: #333;
        text-align: center;
        margin-top: 50px;
      }

      button {
        background-color: #ff6347;
        color: white;
        padding: 10px 20px;
        border: none;
        border-radius: 5px;
        cursor: pointer;
        font-size: 16px;
        transition: background-color 0.3s ease;
      }

      button:hover {
        background-color: #ff4500;
      }

      p {
        margin-top: 20px;
        font-size: 18px;
      }
    </style>
  </head>
  <body>
    <button type="button" onclick="loadDoc()">Request bacon</button>
    <p id="demo"></p>

    <script>
      function loadDoc() {
        const xhttp = new XMLHttpRequest();
        xhttp.onload = function () {
          const response = JSON.parse(this.responseText);
          const listContainer = document.getElementById("demo");
          const ul = document.createElement("ul");
          response.forEach(function (item) {
            const li = document.createElement("li");
            li.textContent = item;
            ul.appendChild(li);
          });
          listContainer.innerHTML = "";
          listContainer.appendChild(ul);
        };
        xhttp.open("GET", "https://baconipsum.com/api/?type=all-meat");
        xhttp.send();
      }
    </script>
  </body>
</html>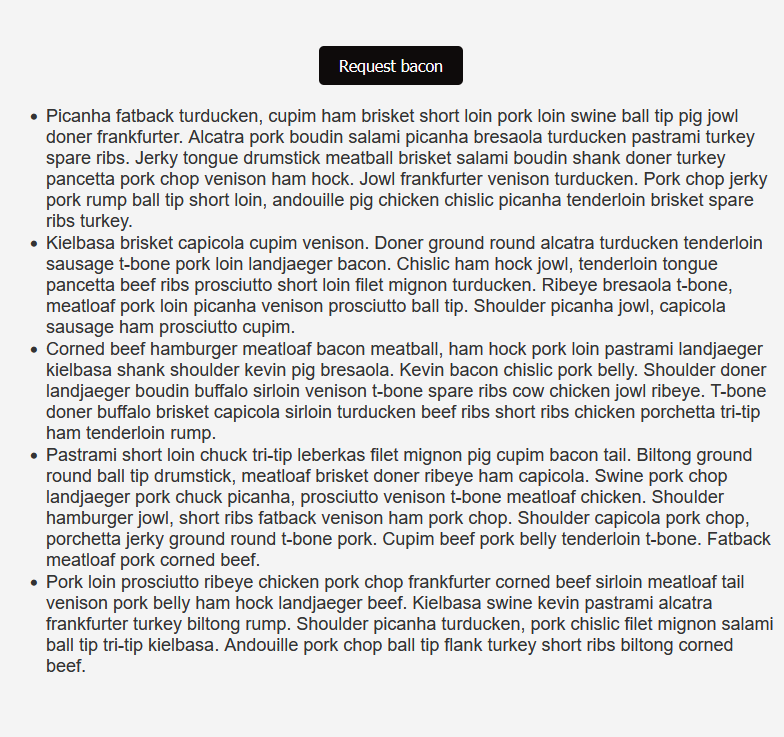
H7 Github API andmete kasutamine
REST (Representational State Transfer) on arhitektuurimudel, mida kasutatakse veebiteenuste loomisel ja rakenduste vahelise suhtluse lihtsustamiseks
import "./styles.css";

// Initialize variables to hold profile information
let profileName = "";
let profileId = "";
let profileLink = "";
let profileRepos = "";
let profilePicture = "";

// Asynchronous function to fetch GitHub profile information
async function fetchProfile(username) {
  try {
    // Fetch data from GitHub API for the given username
    const response = await fetch(`https://api.github.com/users/${username}`);

    // Parse the JSON response
    const data = await response.json();

    // Extract profile information from the response data
    profileName = data.login;
    profileId = data.id;
    profileLink = data.html_url;
    profileRepos = data.public_repos;
    profilePicture = data.avatar_url;

    // Render the profile information on the page
    renderPage();
  } catch (error) {
    // Log any errors that occur during the fetch operation
    console.error("Error fetching profile:", error);
  }
}

// Function to render the profile information on the page
function renderPage() {
  document.getElementById("app").innerHTML = `
    <div>
      <h1>Github profile viewer</h1>
      <p>Please enter profile name: </p>
      <input id="username-input" />
      <div class="content">
        <h1 id="name">Name: ${profileName}</h1>
        <p id="id">Id: ${profileId}</p>
        <p id="reports">Public repositories: ${profileRepos}</p>
        <p id="profile-url">
          Link: <a href="${profileLink}" target="_blank">/users/${profileName}</a>
        </p>
        <div id="profile-avatar">
          <img src="${profilePicture}" alt="${profileName} wait for profile picture...." style="width: 100px; height: 100px; border-radius: 60%;" />
        </div>
      </div>
    </div>
  `;

  // Add an event listener to the input field to handle 'Enter' key press
  document
    .getElementById("username-input")
    .addEventListener("keyup", function (event) {
      // Check if the 'Enter' key was pressed
      if (event.key === "Enter") {
        // Get the value from the input field
        const username = event.target.value;
        // Fetch the profile data for the entered username
        fetchProfile(username);
      }
    });
}

// Initial call to render the page with default content
renderPage();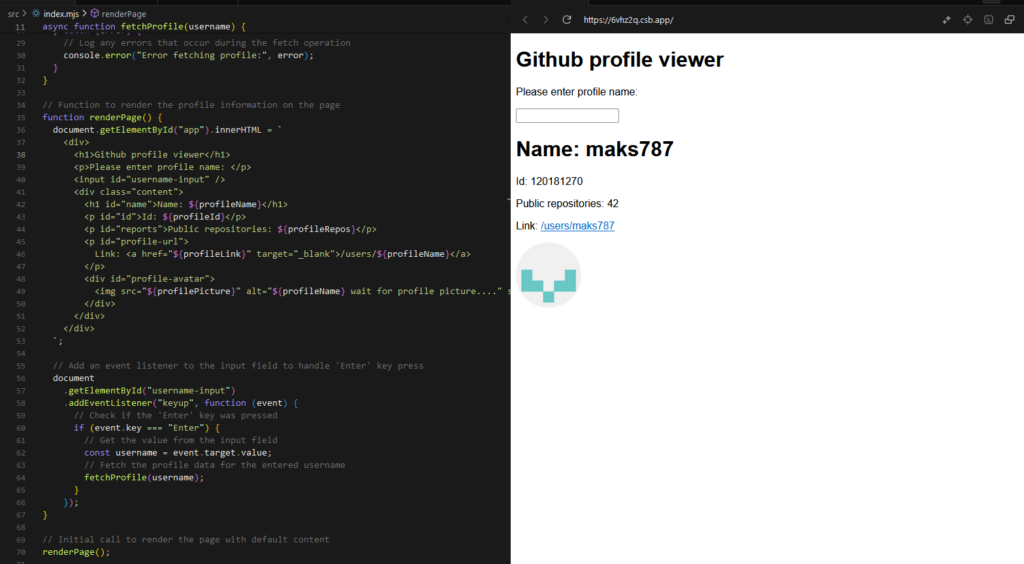
H10
Harjutus 10 Saada email Github push-imisel
1. Looge tühi repo.
2. Kloonige see repo endale arvuti.
3. Loo repo kausta kaks kausta struktuuriga: “.github/workflows”
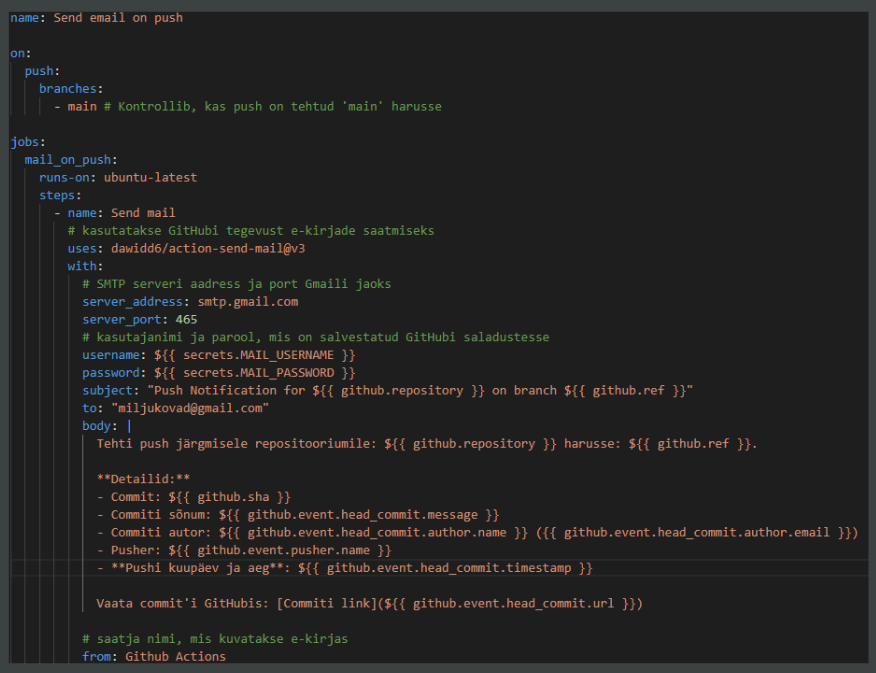
4. Loo workflows kausta YAML fail. Pane nimeks näiteks mail-on-push.yml.
5. Lugege Github Actions struktuurist YAML failide puhul siit: https://docs.github.com/en/actions/quickstart
6. Lisage dawidd6/action-send-mail Github e-maili saatja YAML faili:
name: Send email on push
on:
push:
branches:
- main # Kontrollib, kas push on tehtud 'main' harusse
jobs:
mail_on_push:
runs-on: ubuntu-latest
steps:
- name: Send mail
# kasutatakse GitHubi tegevust e-kirjade saatmiseks
uses: dawidd6/action-send-mail@v3
with:
# SMTP serveri aadress ja port Gmaili jaoks
server_address: smtp.gmail.com
server_port: 465
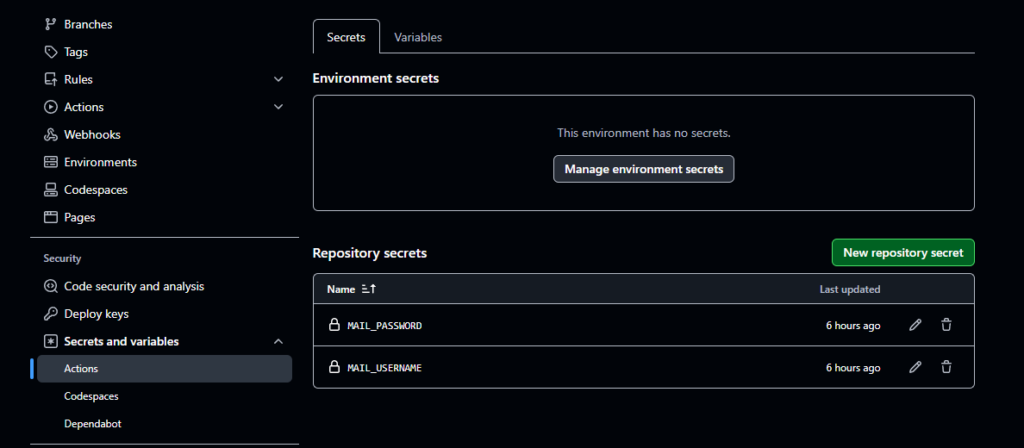
# kasutajanimi ja parool, mis on salvestatud GitHubi saladustesse
username: ${{ secrets.MAIL_USERNAME }}
password: ${{ secrets.MAIL_PASSWORD }}
subject: "Push Notification for ${{ github.repository }} on branch ${{ github.ref }}"
to: "miljukovad@gmail.com"
body: |
Tehti push järgmisele repositooriumile: ${{ github.repository }} harusse: ${{ github.ref }}.
**Detailid:**
- Commit: ${{ github.sha }}
- Commiti sõnum: ${{ github.event.head_commit.message }}
- Commiti autor: ${{ github.event.head_commit.author.name }} ({{ github.event.head_commit.author.email }})
- Pusher: ${{ github.event.pusher.name }}
- **Pushi kuupäev ja aeg**: ${{ github.event.head_commit.timestamp }}
Vaata commit'i GitHubis: [Commiti link](${{ github.event.head_commit.url }})
# saatja nimi, mis kuvatakse e-kirjas
from: Github ActionsLisage nõuetele meili pealkiri koos sisuga, sõnum koos sisuga ja kellele see meil saadetakse
Lisage meili saatjale vajalikud nõuded:
Sain oma meilile teate, et tehti “push”.
Harjutus 11: Vestlusruum serveri ja klientrakenduse vahel
WebSocket API on täiustatud tehnoloogia, mis võimaldab avada kahepoolse interaktiivse suhtlussessiooni kasutaja brauseri ja serveri vahel.
Milleks see on vaja? – Esiteks, et luua enda oma chat, kus võime suhelda omavahel ja/või võime lisada seda oma töökahal, et jälgida seisukorra (nt: tarkvaraarendamisel, kui on tehtud mingi osa – anname teada teistele, et see on tehtud)
Harjutus osa:
1. Luua kaust Vestlusruum
2. Käivita koodiredaktor (nt VS Code, WebStorm vms) ja ava see kaust projektina
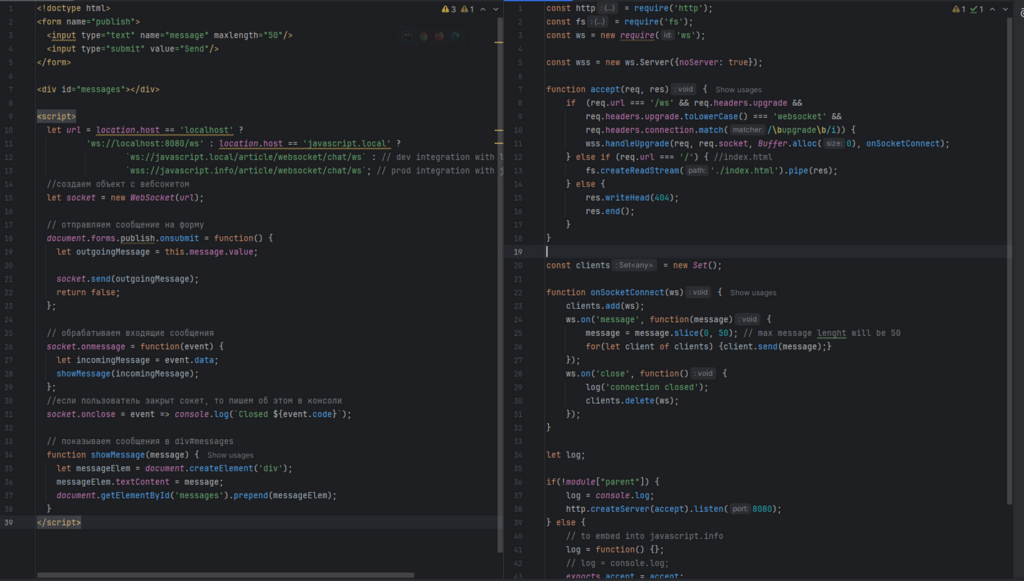
3. Loo kausta fail index.html järgneva sisuga:
<!doctype html>
<form name="publish">
  <input type="text" name="message" maxlength="50"/>
  <input type="submit" value="Send"/>
</form>

<div id="messages"></div>

<script>
  let url = location.host == 'localhost' ?
          'ws://localhost:8080/ws' : location.host == 'javascript.local' ?
                  `ws://javascript.local/article/websocket/chat/ws` : // dev integration with local site
                  `wss://javascript.info/article/websocket/chat/ws`; // prod integration with javascript.info
  //создаем объект с вебсокетом
  let socket = new WebSocket(url);

  // отправляем сообщение на форму
  document.forms.publish.onsubmit = function() {
    let outgoingMessage = this.message.value;

    socket.send(outgoingMessage);
    return false;
  };

  // обрабатываем входящие сообщения
  socket.onmessage = function(event) {
    let incomingMessage = event.data;
    showMessage(incomingMessage);
  };
  //если пользователь закрыт сокет, то пишем об этом в консоли
  socket.onclose = event => console.log(`Closed ${event.code}`);

  // показываем сообщения в div#messages
  function showMessage(message) {
    let messageElem = document.createElement('div');
    messageElem.textContent = message;
    document.getElementById('messages').prepend(messageElem);
  }
</script>
4. Index.js kirjutame järgmise:
const http = require('http');
const fs = require('fs');
const ws = new require('ws');

const wss = new ws.Server({noServer: true});

function accept(req, res) {
    if  (req.url === '/ws' && req.headers.upgrade &&
        req.headers.upgrade.toLowerCase() === 'websocket' &&
        req.headers.connection.match(/\bupgrade\b/i)) {
        wss.handleUpgrade(req, req.socket, Buffer.alloc(0), onSocketConnect);
    } else if (req.url === '/') { //index.html
        fs.createReadStream('./index.html').pipe(res);
    } else {
        res.writeHead(404);
        res.end();
    }
}

const clients = new Set();

function onSocketConnect(ws) {
    clients.add(ws);
    ws.on('message', function(message) {
        message = message.slice(0, 50); // max message lenght will be 50
        for(let client of clients) {client.send(message);}
    });
    ws.on('close', function() {
        log('connection closed');
        clients.delete(ws);
    });
}

let log;

if(!module["parent"]) {
    log = console.log;
    http.createServer(accept).listen(8080);
} else {
    // to embed into javascript.info
    log = function() {};
    // log = console.log;
    exports.accept = accept;
}
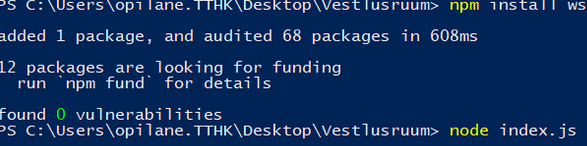
5. Installime ws ja käivitame serveri
6.Ühel lehel on server ning teisel on klient kus võime sisestada andmed ja need salvestavad mõlemal lehel (server leht ja klient leht
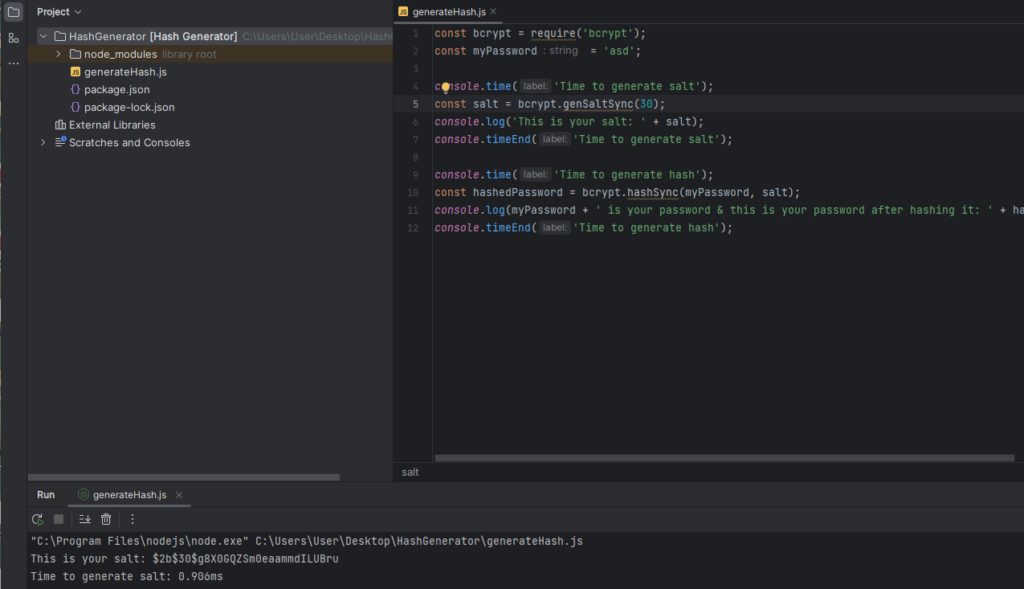
Harjutus 12: Kuidas genereerida turvaline räsi?
- Ava enda koodiredaktor
- Tee uus fail nimega
generateHash.js - Lisa sinna järgnev kood:
const bcrypt = require('bcrypt');
const myPassword = '';

console.time('Time to generate salt');
const salt = bcrypt.genSaltSync(10);
console.log('This is your salt: ' + salt);
console.timeEnd('Time to generate salt');

console.time('Time to generate hash');
const hashedPassword = bcrypt.hashSync(myPassword, salt);
console.log(myPassword + ' is your password & this is your password after hashing it: ' + hashedPassword);
console.timeEnd('Time to generate hash');- Paigaldada bcrypt käsuga
npm install bcrypt - Anna real 2 muutuja
myPasswordväärtuseks mingi tekst, mis on sinu parooliks - Käivita fail parem hiireklõps faili sees ning Run ‘generateHash.js või kiirklahviga Ctrl + Shift + F10
- Muuda
genSaltSyncparameetris rounde ning vaata, mis juhtub

muutis soolakonstandi 30 peale ja sai teistsuguse tulemuse